Kamis, 24 November 2011

Membangun Mail Server Berbasis Debian 5 (Lenny)


Membangun Mail Server Berbasis Debian 5 (Lenny)

  4 komentar


 E-mail merupakan aplikasi internet yang banyak digunakan saat ini untuk komunikasi dua arah. Selain karena kemudahan dalam penggunaannya juga karen kemurahan teknologi yang ditawarkan oleh email ini. E-mail singkatan dari electronic mail juga dapat dianalogikan dengan pengiriman surat yang umum digunakan saat ini melalui kantor pos, atau melalui jasa pengirim surat atau barang. Pengiriman email dilakukan melalui perangakat elektronik seperti HP/PDA.
Proses pengiriman/penerimaan e-mail melibatkan protokol Simple Mail Transfer Protocol (SMTP) dan Post Office Protocol verson 3 (POP3). Protokol SMTP bertugas untuk mempros-es pengiriman mail (Outgoing mail) dan PHP3 bertugas untuk memproses penerimaan mail (Incoming mail).
Jika user atau pemilik e-mail tidak sedang aktif/off-line untuk mengakses e-mail, maka e-mail yang tertuju kepadanya akan ditampung sementara oleh server e-mail sampai pemilik email tersebut mengaksesnya. Hal ini bisa terjadi karena adanya protokol POP3.
Untuk instalasi kali ini saya asumsikan bahwa DNS server sudah terinstall dengan baik, dan jika ingin melihat konfigurasi DNS server sebelumnya dapat dilihat disini.

Langkah-Langkah membuat mail server seperti berikut.
>  Instalasi
Postfix adalah aplikasi yang akan kita installkan untuk membangung sebuah mail server. Untuk melengkapi mail server kita harus menginstallkan software lain yaitu php5, courier-pop, courier-imap, dan Squirrelmail.
a.       Perintahnya
D4V1D:~# apt-get install postfix courier-imap courier-pop php5 squirrelmail
b.      Maka akan keluar pilihan Configuring courier-base

Pilih No
c.       Lalu keluar Postfix Configuration, pilih Local Only (sebab kita hanya akan menginstall mail server dalam skala local sebagai uji coba dahulu).
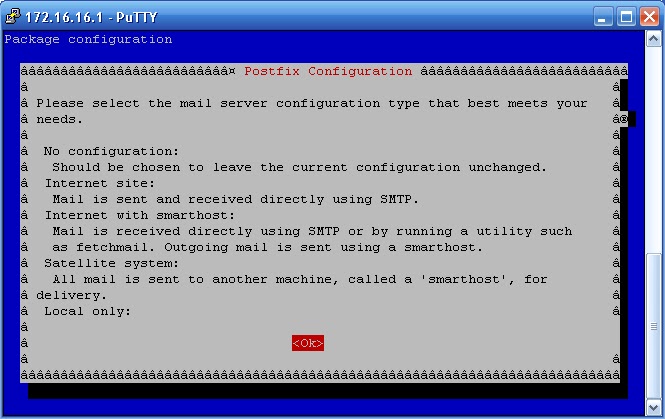


d.      Untuk system mail name masukkan bebas, dan saya pilih mail.bloganakkomputer.com


>  Konfigurasi
a.       Konfigurasi postfix pada file main.cf
D4V1D:~# nano /etc/postfix/main.cf
Tambahkan tanda # pada bagian mydestination dan mailbox_command.
Tambahkan pada baris terakhir
home_mailbox = Maildir/
Sehingga akan menjadi seperti gambar berikut.

b.      Kemudian masuk direktori skel dan buat direktori Maildir
D4V1D:~# cd /etc/skel/
D4V1D:/etc/skel# maildirmake Maildir 

c.       Konfigurasi squirrelmail
Buat konfigurasi untuk squirrelmail.
D4V1D:~# squirrelmail-configure
Kemudian akan muncul
Masukkan command
Command >> d
Lalu ketik courier
Command >> courier
Lalu akan keluar konfigurasi
imap_server_type = courier
default_folder_prefix = INBOX.
trash_folder = Trash
sent_folder = Sent
draft_folder = Drafts
show_prefix_option = false
default_sub_of_inbox = false
show_contain_subfolders_option = false
optional_delimiter = .
delete_folder = true

Press any key to continue...
Tekan enter
Save data
Command >> s
Lalu Quit
Command >> q

d.      Buat Virtualhost squirrelmail dengan cara edit /etc/apache2/apache2.conf
D4V1D:~# nano /etc/apache2/apache2.conf
Pada baris terakhir tambahkan,
Include /etc/squirrelmail/apache.conf
Sehingga menjadi 


e.       Restart Apache
D4V1D:~# /etc/init.d/apache2 restart

>  Pengujian
A.    Dari computer server
D4V1D:~# lynx bloganakkomputer/squirrelmail
Sehingga akan keluar

Untuk uji coba apakah mail server sudah dapat berjalan dengan benar, kita perlu login, maka kita akan membuat user dahulu dari server dengan perintah
D4V1D:~# adduser angela

Adding user `angela' ...
Adding new group `angela' (1003) ...
Adding new user `angela' (1003) with group `angela' ...
Creating home directory `/home/angela' ...
Copying files from `/etc/skel' ...
Enter new UNIX password:
Retype new UNIX password:
passwd: password updated successfully
Changing the user information for angela
Enter the new value, or press ENTER for the default
        Full Name []:
        Room Number []:
        Work Phone []:
        Home Phone []:
        Other []:
Is the information correct? [Y/n] y

Untuk melakukan test konfigurasi mail server pada local mesin (server) ikuti langkah-langkah
di bawah ini :
·         Masuk ke localmesin

D4V1D:~# telnet localhost 25

Trying 127.0.0.1...
Connected to localhost.
Escape character is '^]'.
220 bloganakkomputer.com ESMTP Postfix (Debian/GNU)
·         kemudian ketikan perintah di bawah ini
Anda : ehlo virtual.test
250-bloganakkomputer.com
250-PIPELINING
250-SIZE 10240000
250-VRFY
250-ETRN
250-STARTTLS
250-ENHANCEDSTATUSCODES
250-8BITMIME
250 DSN

Anda: mail from:angela@bloganakkomputer.com
Server: 250 2.1.0 Ok

Anda: rcpt to:david@bloganakkomputer.com
Server: 250 2.1.5 Ok

Anda: data
Server: 354 End data with .

Anda: Subject:mencoba kirim email
Hai,...
Namaku Angela
. (tanda titik)
Server: 250 2.0.0 Ok: queued as 17B2F503BA

Anda: quit
Server: 221 2.0.0 Bye

Screenshoot Langkah Telnet

Langkah di atas merupakan langkah untuk mengirim email kedavid@bloganakkomputer.com yang merupakan user default (saat instalasi) dengan user angela@bloganakkomputer.com yang merupakan user kedua dengan program telnet.
Apakah email di atas telah terkirim ke user david? Mari kita cek dari computer client.

B.     Dari computer client
Dari computer client dengan browser, bukahttp://bloganakkomputer.com/squirrelmail
Masukkan username dan passwordnya, enter.
Buka Inbox dan cek Inbox.
Coba kita buka.
Lalu coba balas, dengan memilih reply.
Kemudian logout dan login dengan user angela.
Cek Inboxnya, bila sudah terkirim, maka mail server yang kita bangun telah berhasil.
Sampai langkah ini, bila proses mengirim (baik dari telnet maupun dari browser internet client) dan menerima telah berhasil, maka dapat kita pastikan mail server telah dapat berjalan lancar.
Namun sebenarnya ada yang masih kurang dengan alamat domainnya. Kita harus memasukkan alamat http://bloganakkomputer.com/squirrelmail untuk dapat mengaksesnya. Bagaimana caranya, supaya untuk dapat mengaksesnya dengan alamat http://mail.bloganakkomputer.com/

Firewall on Debian Lenny

There is no doubt that a Linux system is many times more secure than a Windows one. That isn’t an excuse to ignore risk however, as there are still ways to compromise a system. The internet is still the modern equivalent of the Wild West and you need to protect yourself whatever you do.
Installing a firewall should be job number one for any machine of any kind that is going to be connected to a network. Even geeks like me who have a hardware firewall on their router, still have a firewall on the local machines as a second line of defense against the naughty people.
468_deb
This is where Debian falls down in my opinion. There is an iptables basis for a firewall built in, but it seems to need a lot of configuration to get it working. I got round this by using Firestarter, which is an external program that packages everything in a nice friendly GUI.
Firestarter is available through Synaptic Package Manager or apt-get, and installs quite quickly. There are a couple of configuration screens but the defaults are pretty much all you need unless you still use dialup or want to share your connection with other machines.
apt-get install firestarter
If installed through apt-get or Synaptic the package installs itself as a service so it will run whenever you use your machine. This is a good thing as you are automatically protected. I’m not sure I’m quite up to configuring a firewall every time I use the machine!
I love wizards, I think they are great. Tall pointy hats and big sleeves. No!
Firestarter has a configuration wizard which takes all the grunt work out of setting things up for you. The program automatically detects your network hardware and asks you to choose your Internet facing device. If you are on broadband or have a switch or router then this will probably be eth0.
Unless you have a static IP address, leave the tick by IP Address is assigned via DHCP. This option will be suitable to most users as the majority of ISPs use dynamic IP addressing.
You next choice will be whether to allow internet connection sharing. That is if you want other machines to connect to the internet through your Debian box.
The next page is the last one. See, I told you it was easy.
Here you get to save your options and start the program. If you save here and change your mind later, you can always reconfigure it, nothing is written in stone.
f1
f2
f3
f4
When you first start Firestarter you will see the status page. It shows you pretty much what’s going on with it. The main thing you want to check is the Status on the left. There should be a blue circle with the word ‘Active’ underneath. If you have that then you are protected.
f5
When the firewall is active it will record any events that it sees. You can check these on the Events page. It is wise to check this page periodically once first configured to ensure it isn’t blocking something you want to let through. Other than that you can just leave it alone to do its thing!
Firewalls are another massive subject that go way beyond the scope of this post, but you should at least have a basic understanding of one of many firewall options open to you and have one running while you explore the subject further.

Membuat Web Server di Debian

Membuat Web Server di Debian


————————————————————————————-

Linux merupakan SO yang stabil dan banyak digunakan untuk keperluan webserver. teknologi yang banyak digunakan dalam membangun web server adalah LAMP (linux,apache,mysql, dan php)

INSTALASI

1. bertindak sebagai root

2. instal webserver apache2

debian:~# apt-get install apache2

Reading package lists… Done

Building dependency tree… Done

The following extra packages will be installed:

apache2-mpm-worker apache2-utils apache2.2-common libapr1 libaprutil1 libpq4

libsqlite3-0

The following NEW packages will be installed:

apache2 apache2-mpm-worker apache2-utils apache2.2-common libapr1

libaprutil1 libpq4 libsqlite3-0

0 upgraded, 8 newly installed, 0 to remove and 0 not upgraded.

Need to get 2428kB of archives.

After unpacking 6300kB of additional disk space will be used.

Do you want to continue [Y/n]?

y

Get:1 http://kambing.ui.edu stable/main libapr1 1.2.7-8.2 [109kB]

Get:2 http://kambing.ui.edu stable/main libpq4 8.1.13-0etch1 [284kB]

Get:3 http://kambing.ui.edu stable/main libsqlite3-0 3.3.8-1.1 [194kB]

Get:4 http://kambing.ui.edu stable/main libaprutil1 1.2.7+dfsg-2 [68.5kB]

Get:5 http://kambing.ui.edu stable/main apache2-utils 2.2.3-4+etch6 [344kB

3. setelah apache terinstal. buktikan dengan membuka web browser dan buka halaman

http://localhost,

atau jika dns sudah terinstal sebelumnya anda dapat menuliskan alamat webnya contoh

http://www.debianmaros.org,

dan akan terlihat tampilan berikut :

3. anda dapat melihat file-file web dalam folder /var/www/apache2-default

4. instal php5

debian:~# apt-get install php5

5. buatlah file baru dengan nama cobacoba.php

debian:~# nano /var/www/cobacoba.php

6. tuliskan kalimat berikut di dalamnya

7. jalankan web browser, dan buka halaman web anda

http://www.debianmaros.org/cobacoba.php

8. instal php5-mysql

debian:~# apt-get install php5-mysql

Reading package lists... Done

Building dependency tree... Done

The following extra packages will be installed:

libmysqlclient15off mysql-common

The following NEW packages will be installed:

libmysqlclient15off mysql-common php5-mysql

0 upgraded, 3 newly installed, 0 to remove and 0 not upgraded.

Need to get 1911kB of archives.

After unpacking 4289kB of additional disk space will be used.

Do you want to continue [Y/n]?

y

Get:1 http://kambing.ui.edu stable/main mysql-common 5.0.32-7etch6 [54.2kB]

Get:2 http://kambing.ui.edu stable/main libmysqlclient15off 5.0.32-7etch6 [1792k

9. instal mysql-server

debian:~# apt-get install mysql-server

Reading package lists... Done

Building dependency tree... Done

The following extra packages will be installed:

libdbd-mysql-perl libdbi-perl libnet-daemon-perl libplrpc-perl

mysql-client-5.0 mysql-server-5.0

Suggested packages:

dbishell libcompress-zlib-perl tinyca

The following NEW packages will be installed:

libdbd-mysql-perl libdbi-perl libnet-daemon-perl libplrpc-perl

mysql-client-5.0 mysql-server mysql-server-5.0

0 upgraded, 7 newly installed, 0 to remove and 0 not upgraded.

Need to get 33.4MB of archives.

After unpacking 86.9MB of additional disk space will be used.

Do you want to continue [Y/n]?

y

Get:1 http://kambing.ui.edu stable/main libnet-daemon-perl 0.38-1.1 [45.8kB]

Get:2 http://kambing.ui.edu stable/main libplrpc-perl 0.2017-1.1 [34.9kB]

Get:3 http://kambing.ui.edu stable/main libdbi-perl 1.53-1etch1 [676kB]

10. buat password untuk mysql

debian:~# mysqladmin -u root password

Passwordmu

11. konfigurasi file php.ini dengan mengetikkan

#nano /etc/php5/apache2/php.ini

12. carilah baris ; extension=mysql.so, …..(pake ctrl+w) untuk search kalimat, lalu ketik mysql.so ……..hilangkan tanda titik koma (;) didepannya hingga menjadi extension=mysql.so

13. restart apache

debian:~# /etc/init.d/apache2 restart

14. jika mysql telah terinstal, lakukan pengetesan dengan masuk ke mysql

debian:~# mysql -u root -p

Enter password:

Welcome to the MySQL monitor. Commands end with ; or \g.

Your MySQL connection id is 10

Server version: 5.0.32-Debian_7etch6-log Debian etch distribution

Type ‘help;’ or ‘\h’ for help. Type ‘\c’ to clear the buffer.

mysql>

15. instal phpmyadmin

debian:~# apt-get install phpmyadmin

Reading package lists… Done

Building dependency tree… Done

Recommended packages:

php5-mcrypt php4-mcrypt php5-gd php4-gd

The following NEW packages will be installed:

phpmyadmin

0 upgraded, 1 newly installed, 0 to remove and 0 not upgraded.

Need to get 3608kB of archives.

After unpacking 14.1MB of additional disk space will be used.

Get:1 http://kambing.ui.edu stable/main phpmyadmin 4:2.9.1.1-8 [3608kB]

16. konfigurasi file apache2.conf

debian:~# nano /etc/apache2/apache2.conf

17. pada file apache2.conf tsb, buat sebuah alias baru bernama “phpmyadmin” dan diarahkan ke /usr/share/phpmyadmin dengan menggunakan kode

Alias /phpmyadmin “/usr/share/phpmyadmin/”

Options Indexes MultiViews

AllowOverride None

order allow,deny

Allow from all

18. aksek phpmyadmin melalui web browser dengan mengetikkan pada halaman web

http://www.debianmaros.org/phpmyadmin/index.php

19. tuliskan user dan passwordnya sehingga akan muncul tampilan
source : http://desvianri.wordpress.com/2009/02/26/membuat-server-pada-debian-woody/

Sharing data DI DEBIAN VERSI 5.0

Sharing data DI DEBIAN VERSI 5.0

Samba adalh aplikasi linux yang berguna untuk berbagi file dan printer. walaupun konfigurasinya tak semudah sharing file di windows, tapi menggunakan samba lebih aman.
Yang pertama harus install dahulu samba
dengan cara
#apt-get install samba
kemudian masuk ke konsole (masuk super user mode)
#nano /etc/samba/smb.conf
nanti hapus semua tulisan yang ada sampai bersih
kemudian isi dengan
[global]
workgroup = workgroup
security = share
[homes]
comment = Home Directories
path = /home/linux
browseable = yes
public = yes
read only = no
guest ok = yes
writable = yes
setelah itu simpan
kemudian
#chmod -R 0777 /home/linux
restart servicenya
#/etc/init.d/samba restart
buka konqueror (kde 3.5.10)/ file browser lain
ketikan smb://IP komputer anda yang dishare..
smb://192.168.1.10, maka file yang ada di home/linux sudah siap dishare
ket:
[homes]=nama file sharing anda
comment : keterangan dari file sharing anda
path : folder yang anda sharing
browseable = dapat di browse
public = dapat dilihat oleh semua ip adress
read only = hanya dibaca
guest ok = tanpa username dan password
writable = dapat ditulis dan dihapus
tambahan lain:
hosts allow :
cth: hosts allow = 192.168.1.10/25 192.168.1.9
ip adress yang diijinkan 192.168.1.9 192.168.1.10/25, dari 10-25 diijinkan selain itu tidak
semoga berhasil.

Konfigurasi WebMail Server Debian Lenny

Konfigurasi WebMail Server Debian Lenny

Setelah berhasil Mengkonfigurasi Web Server Selanjutnya kita akan mengkonfigurasi Webmail Server. Pada setting kali ini akan sangat memerlukan ketelitian. Silahkan ikuti langkah berikut : 
·         Kata2 yang bercetak tebal adalah perintah yang dijalankan pada komputer server.
·         Kata2 yang berwarna merah adalah yang harus anda ubah atau buat.

1)     apt-get install postfix squirrelmail courier-imap courier-pop
Create directories for web-based administration    : NO
Local only                                                                      : OK
General type of mail configuration                             : Internet Site
System mail name                                                         : smkcijangkar.sch.id
2)     pico /etc/apache2/apache2.conf
# Include the virtual host configurations:
Include /etc/apache2/sites-enabled/
Include /etc/squirrelmail/apache.conf
3)     pico /etc/squirrelmail/apache.conf
# users will prefer a simple URL like http://webmail.example.com
#
# DocumentRoot /usr/share/squirrelmail
# ServerName webmail.example.com
#
DocumentRoot /usr/share/squirrelmail
ServerName    mail.smkcijangkar.sch.id

* Jangan ubah / hapus baris yang lainnya.
4)     /etc/init.d/apache2  restart
Restarting web server: apache2 ... waiting .
5)     Buka browser komputer client dan masukkan url mail.smkcijangkar.sch.id anda akan melihat tampilan ini :
https://blogger.googleusercontent.com/img/b/R29vZ2xl/AVvXsEiwebnGEJebaXjaxWeErztvPG322hahTp802vMbdRMWWKMEFf09jPGKPw4FgeJMdiLfM4vAfe5t8hSWM62TvO6WCOK5J10IT3mYcIOQx3v_7V8NrNWBNNA3iZFMDyYSJMTa1snCnSTmlM7b/s400/ScreenHunter_02+Oct.+17+12.07.jpg
6)     maildirmake  /etc/skel/Maildir
7)     adduser antok
8)     adduser anisa
9)     dpkg-reconfigure postfix
Local only                                                                        : OK
General type of mail configuration                               : Internet Site
System mail name                                                           : smkcijangkar.sch.id
Root and postmaster mail recipient                              : (kosongkan)
Other destinations to accept mail for (blank for none): 172.16.1.0/26 (<- tambahan baris terakhir)
Force synchronous updates on mail queue                : No
Local networks                                                                : 172.16.1.0/26
Use procmail for local delivery                                     : NO
Mailbox size limit (bytes)                                               : 0
Local address extension character                              : +
Internet protocols to use                                              : ipv4
10)pico /etc/postfix/main.cf
inet_interfaces = all
inet_protocols = ipv4
home_mailbox = Maildir/

* Jangan ubah / hapus baris lainnya.


11)/etc/init.d/postfix  restart
Stopping Postfix Mail Transport Agent : postfix.
Starting Postfix Mail Transport Agent   : postfix.

12)/etc/init.d/courier-imap  restart
Stopping Courier IMAP server : imapd.
Starting Courier IMAP server   : imapd.

13)/etc/init.d/courier-pop  restart
Stopping Courier POP3 server : pop3d.
Starting Courier POP3 server   : pop3d.

14)Buka Browser PC client anda. Masukkan url "http://mail.smkcijangkar.sch.id" Setelah itu silahkan email2an Jika berhasil maka konfigurasi WebMailserver anda sukses.

Instalasi dan Konfigurasi NTP SERVER LOCAL Di Debian Lenny 5.0

Instalasi dan Konfigurasi NTP SERVER LOCAL Di Debian Lenny 5.0

Secara umum, Network Time Protocol (NTP) adalah protocol untuk meng-sinkron-kan sistem waktu pada komputer terhadap sumber (server). Terdapat beberapa situs NTP “Stratum 1″ (situs NTP dengan sumber waktu dari atomic clock) and “Stratum 2″ (situs NTP dengan sumber waktu dari situs NTP lain, dengan sedikit penurunan tingkat akurasi) yang dapat digunakan oleh publik. Namun saya akan membuat bagaimana membuat ntp server lokal, jadi tidak perlu adanya akses internet. Caranya sangat mudah:


#Instalasinya#
 pertama masuk root console, dan install paket ntp yang dibutuhkan
      # apt-get install ntp ntpdate
     # nano /etc/ntp.conf
edit dan tambahkan :

# /etc/ntp.conf, configuration for ntpd; see ntp.conf(5) for help

driftfile /var/lib/ntp/ntp.drift
# Enable this if you want statistics to be logged.
#statsdir /var/log/ntpstats/

statistics loopstats peerstats clockstats
filegen loopstats file loopstats type day enable
filegen peerstats file peerstats type day enable
filegen clockstats file clockstats type day enable

# You do need to talk to an NTP server or two (or three).
#server ntp.your-provider.example

# pool.ntp.org maps to about 1000 low-stratum NTP servers. Your server will
# pick a different set every time it starts up. Please consider joining the
# pool: <http://www.pool.ntp.org/join.html>
#server 0.debian.pool.ntp.org iburst dynamic
#server 1.debian.pool.ntp.org iburst dynamic
#server 2.debian.pool.ntp.org iburst dynamic
#server 3.debian.pool.ntp.org iburst dynamic
server 127.127.1.0 iburst
fudge 127.127.1.0 stratum 10

# Access control configuration; see /usr/share/doc/ntp-doc/html/accopt.html for
# details. The web page <http://support.ntp.org/bin/view/Support/AccessRestrictions>
# might also be helpful.
#
# Note that "restrict" applies to both servers and clients, so a configuration
# that might be intended to block requests from certain clients could also end
# up blocking replies from your own upstream servers.

# By default, exchange time with everybody, but don't allow configuration.
restrict -4 default kod notrap nomodify nopeer noquery
restrict -6 default kod notrap nomodify nopeer noquery

# Local users may interrogate the ntp server more closely.
restrict 127.0.0.1
restrict ::1

# Clients from this (example!) subnet have unlimited access, but only if
# cryptographically authenticated.
#restrict 192.168.123.0 mask 255.255.255.0 notrust


# If you want to provide time to your local subnet, change the next line.
# (Again, the address is an example only.)
#broadcast 192.168.123.255

# If you want to listen to time broadcasts on your local subnet, de-comment the
# next lines. Please do this only if you trust everybody on the network!
#disable auth
#broadcastclient

Simpan dengan mengetikkan ctrl+o

Setelah itu restart program dengan mengetikan 
#/etc.init.d/ntp restart

ketikkan perintah 
#ntpq -p (untuk melihat hasil konfigurasi)

> *gambar ketika sudah sinkron dengan server ntp local terdapat tanda * didepan LOCAL (0)

Rabu, 23 November 2011


Cara Setting Proxy pada Mozilla Firefox dan Opera


Jadi ceritanya gini, dikampus saya kalo mau akses internet via wi-fi harus setting proxy dulu. kalau gak di setting yach gak bakalan bisa akses internet. Awalnya saya bingung cara settingnya, saya pikir kalo setting proxy itu harus setting di Control Panel. Eh, Ternyata yang disetting hanya browsernya saja. Caranya cukup mudah, oke dech langsung saja. Ikuti tutorial berikut ini:

A. Setting Proxy di Mozilla Firefox
1. Buka Mozilla Firefox
2. Klik Menu Tools –> Options.. (kalo di Linux, pilihan Options ada di menu Edit)
3. Klik tab ‘Advanced’ lalu klik tab ‘Network’ setelah itu klik tombol Settings
4. Pilih ‘Manual proxy configuration’, pada HTTP Proxy isikan pengaturan proxy yang berlaku di kantor atau instansi Anda, jangan lupa masukkan nomor Port-nya. Centang ‘Use this proxy server for all protocols’.
5. Klik Tombol OK pada semua kotak dialog.
6. Silahkan cek apakah sudah bisa browsing, kalo belum bisa tutup Mozilla lalu buka lagi.
B. Setting Proxy di Opera
1. Buka Browser Opera.
2. Klik Menu Tools –> Preferences..
3. Klik tab ‘Advanced’ lalu klik ‘Network’ setelah itu klik tombol ‘Proxy Servers..’
4. centang pada HTTP Proxy, isikan pengaturan proxy yang berlaku di kantor atau instansi Anda, jangan lupa masukkan nomor Port-nya. lakukan hal yang sama pada ‘HTTPS’ dan ‘FTP’
5. Klik Tombol OK pada semua kotak dialog.
6. Silahkan cek apakah Opera sudah bisa browsing, kalo belum bisa tutup Opera lalu buka lagi.


Cara Sharing File Di Linux dan juga di windows 7
Turitorial simple ini saya buat, untuk catatan saya supaya kaga lupa dan juga untuk menambah pengetahuan bagi yang lain. setelah baca baca dan googling tentang cara seting file buat share data antara komputer linux dengan komputer windows akhirnya ketemu juga dan saya coba buatkan catatannya. ok tahap pertama saya seting dari sisi windows dulu ya yang gampang aja dulu haha.

Langsung kita Mulai aja ya.
Masuk ke windows pilih Start dan cari Network and Sharing Center, seperti contoh dibawah ini :


Setelah itu pilih change and advance sharing


setelah itu enable file sharing gambarnya kaya dibawah ini dan jangan lupa turn off password ya.


ok dari sisi windows si gt aja caranya setelah itu si tingal klik kanan aja apa yang mau di share folder datanya atau printernya. kalo ga ngerti kata bang ajiz gagap mah " Terrrrlalu"

Langsung ke Ubuntu 11.04 skrg ya. login dan masuk ke bagian power-system seting gambarnya kurang lebih kaya dibawah ini d.


setelah itu pilih System => Ubuntu software center


abis itu ketikan samba (ini adalah software yang berfungsi mengatur share file di Linux) kulang lebih kaya gini lah caranya ya

terus klik install. setelah install coba cek sekali lagi dibagian power-system seting-trus system cek apakah samba sudah teriinstal kaya gini ni contohnya.

kalo uda terinstall skrg kita tingal mengatur saja file dan printer apa yang mau kita share. cuman kita set dulu servernya ya
contoh gambarnya kaya gini

klik preferences server setings

workgroupnya apa yang kita mau masuk kalo workgroup ketikan aja workgroup. rubah tulisan penguin diatas dengan workgroup tar jadinya kaya gini nie coy

kecil banget ya contoh langsung tu males ngecrrrooop atau mau di croopin skalian jadi kaya gini nie kalo uda di croop


klik add green plus untuk mulai melakukan share file or print


 kemudian klik akses mau dikasinya ke siapa hanya orang tertentu atau kah untuk semua orang setingannya kaya gini


dah beres d skrg tingal di cek aja dibagian network untuk windows dan ubuntu apakah sudah saling nyambung atau blm. kalo blm coba cek cara konfigurasi networking linux dan juga windows di post yang sebelumnya sudah saya posting semoga bermanfaat buat semua tulisan ini ya... SELAMAT MENCOBA ga tau tanya om Google aja ya jangan saya. saya juga banyakan dapat infonya dari mbah google soalnya contoh akhir dari proses turitorial ini adalah sebagai berikut :


untuk mencari dan mengetahui workgroup name ketikan perintah berikut ini di terminal linux